
Migrating from Pelican to Hugo - Using Claude Code
You can read about why I decided to migrate from Pelican to Hugo, but this post is about how I actually did it — and more interestingly, how I used Claude Code to handle most of the heavy lifting.
I’ve been looking for a real project to try out Claude Code — something more substantial yet another note-taking app. This migration turned out to be the perfect opportunity.
(Cover art image generated by black-forest-labs/flux-schnell text-to-image open source model running on Nebius AI Studio)
TL;DR
- I wrote very little code by hand — about 95% of the migration was done via Claude prompts.
- Claude Code did an excellent job overall. I was genuinely impressed.
- There were a few missteps where I had to intervene and course-correct. (See Things to Watch Out For)
- I also discovered some best practices that make using AI coding tools more effective.
- My key takeaways:
- Claude (and other modern AI coding assistants) are capable of much more than just writing code snippets.
- Treat them like junior engineers — assign tasks, review their output, and guide as needed.
- Always sanity check their work.
- These tools can dramatically accelerate development by taking care of the grunt work.
- I thought interacting with Claude using CLI would be less efficient. But the vscode integration made it reasonbly fluid.
- At the start, I was ‘giving orders’ to Claude: “change this / fix this error / etc”. But by the end, we were practically buddies: “Nice work! Now go ahead and git commit.” 😄
- I genuinely believe AI coding tools can amplify a developer’s abilities — like having a junior dev who never sleeps (but occasionally hallucinates 😅).
Migration Workflow
Step 1: Clone Your Pelican Site
Start by copying your existing Pelican site:
| |
Step 2: Open in VS Code + Start Claude
Open your new folder in VS Code:
| |
Then start Claude Code inside VS Code.
Step 3: Begin Migration
Here’s the prompt I gave Claude:
This is a Pelican-based site. Migrate it to use Hugo. Use the Hugo theme PaperMod.
Claude worked for about 5 minutes. At the end of that session, I had a functional Hugo site! It:
- Converted configuration files from Pelican to Hugo
- Moved content to fit Hugo’s directory structure
- Updated content front matter with taxonomies
Seriously impressive. 😀
Step 4: Additional Prompts I Used
Most of my prompts were high-level directives, and Claude handled them well:
- Display a custom home page
- Show all social links on the home page
- Fix broken image links throughout the site
- Show tags and categories on the post index page
- Display tags and categories at the top of each post
- Add Google Analytics (only for production)
- Convert internal links from relative to absolute paths
- Generate GitHub Actions workflow to deploy Hugo site to GitHub Pages
The last task created .github/workflows/hugo.yml. However, it was outdated, so I updated it using the official Hugo GitHub Pages guide.
📌 Pro tip: Always review what the AI generates.
Step 5: Theme Change — From PaperMod to Stack
I liked the PaperMod theme… until I discovered the Stack theme. 😆
To switch, I just prompted:
Let’s try out the Stack theme.
Claude handled:
- Renaming PaperMod-specific files (e.g.,
hugo.toml.papermod) - Cloning and setting up the Stack theme
- Updating configurations and layouts
Then, I gave further prompts like:
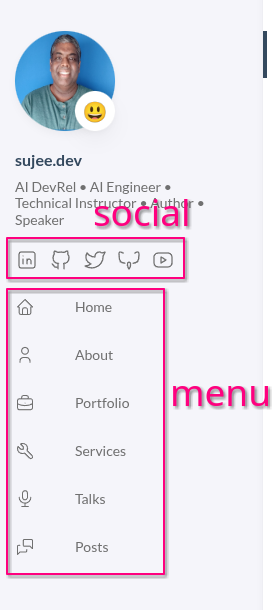
- Add social icons → It created SVGs for YouTube, Bluesky, etc.
- Add icons for menu items → More SVGs + menu integration
- Display tag cloud on the
/postsindex page
The output was clean and visual. Here’s a sample:
Things to Watch Out For
Claude sometimes implemented things that technically worked — but weren’t ideal.
For example:
Display tags in lowercase with a light blue background.
Claude hardcoded styles into several HTML templates. Not ideal. Even I — not a frontend dev — knew that CSS classes would be more maintainable.
So I asked:
Can you create a reusable component instead?
Claude replied:
“Yes, that’s a better idea. Let me update it.”
And it did.
Lesson: AI tools follow instructions literally. They’re powerful, but not always opinionated. So keep reviewing, prompting, and nudging them in the right direction.
Best Practices
1. Use Git from the start
Set up a git project early on:
| |
Then commit often. You can even ask Claude to handle commits:
| |
It identifies changes and writes the commit message. Handy.
2. Use Branches for A/B Testing
Trying out two designs? Use Git branches:
| |
3. Commit Small, Commit Often
Tiny changes deserve their own commits. Example:
- ✅ Changed button color → commit
- ✅ Added tag cloud → commit
This makes rollbacks and debugging easier.
4. Ask for Options First
Instead of jumping in with:
Add Google Analytics only for production
Try:
I want to add GA, but only for production. What are my options?
Claude will give you options. Then say:
Implement option 2
This leads to cleaner results and more control.
My Takeaways
1. Claude Code was pretty fluid to use.
I thought interacting with Claude using CLI / prompting would not be efficient. I was happy to proven wrong. The vscode intergration was pretty good. Eventually, the interaction felt natural and fast.
2. Claude Can Execute High-Level Instructions
Instead of asking for a specific code snippet, you can give broader goals:
Make the site more mobile-responsive
It figures out what’s needed and does it.
3. Let Claude Fix Errors
Paste in the error message and say:
Fix this: [paste error]
Nine times out of ten — it will. 😄
4. Experiment Like a Pro
Think of Claude as two junior devs. Ask one to implement a feature using Option A, the other with Option B — then pick the best result.
5. Don’t Be Afraid to Roll Back
If something looks off, simply say:
Revert the last change
Claude will undo it.
Fun Facts from the migration
1. Getting Chummy with Claude 🤖
At first, I treated Claude like a command-line tool:
“Do this.”
“Fix this error.”
“revert back”
But by the end? We were basically coworkers.
“That’s perfect! commit to git”
“Nice work — now let’s tighten up the spacing just a bit”
2. Hitting API limit 🚧
Ran into API limits a couple of times — turns out Claude needs coffee breaks too. 😆
Luckily, the limits reset within a few hours. (I’m on the $20/month plan)
Wrapping Up and Next Steps
This was one of the smoothest migrations I’ve done — thanks to Claude Code. Not only did it handle the conversion, but it also helped me explore and customize Hugo faster than I could’ve on my own.
Musings
Whether you’re a seasoned developer or just getting started, if you’ve been on the fence about using AI coding tools, my advice is simple: embrace them now.
I’ve had plenty of project ideas I never followed through on because:
- I didn’t know how to code up XYZ
- I didn’t have the time to learn a new tool or framework
- It felt like too much effort for a hobby project
- Or I didn’t want to hire someone to implement a hobby project
- ..and so on.
But now? AI coding tools let me spin up a working proof-of-concept site quickly — and with surprisingly little code.
If you’ve been dreaming up a side project but held back by technical hurdles — now’s the time. Go build it.
The best way to learn these tools is by doing a real project. You’ll quickly discover what they do well, where they need guidance, and how to get the most out of them.
I genuinely believe AI coding tools can amplify a developer’s abilities — like having a junior dev who never sleeps (but occasionally hallucinates 😅).
Happy building